
Welcome, you want to setup your own domain on blogger? Good idea!
Like you, all blogger want their blog to succeed. Customization domain name is initial and easy step to reach success. Success in term of increasing your blog follower or earning money.
Before moving forward you need to know about How your domain should be ?
Google BlogSpot allow you to change your URL from yoururl.blogspot.com to yoururl.com domain at free of cost. Then why not use custom domain, every blogger must have custom domain instead of blogspot.

You can buy domain at very cheap cost 0.01$ (111 INR). I recommend you to register your domain click here to register on Godaddy.
Confuse to choose domain service provider then clear your confusion here Best Domain Service Provider .
Confuse to choose domain service provider then clear your confusion here Best Domain Service Provider .
It’s take less than 5 min to setup your domain with Godaddy after successful process your blog will be visible to new domain.
So let get start with Godaddy.
For customizing domain you have to do some manual setting in Godaddy account and in your bloggeraccount.
Let’s do manual setting on Godaddy aoount.
Using Custom Domain With Godaddy :
Before actual process buy domain from Godaddy.Com. for registering your domain you need to pay if you buy one year plan for domain registration then you have to pay 0.01$(111 INR).
As you are blogger you don’t need to buy hosting plan only register your domain.
Once you have registered, then you can move further for actual process.
STEP 1: Log In into Godaddy.Com
Click on domain, then you will get a list of your registered domain then click on manage.

Once you click on Manage you will get similar screen shot like below, instead of BloggerSupports.com your domain name will appear.
STEP 2: Tab on "DNS ZONE FILE" And then click on Add Record.

once you click on Add Record, then you will see screen shot like below instead of this value you will get empty box.
STEP 4 : Choose record type CNAME (Alias) and add following entries.
RECORD TYPE: CNAME (Alias)
HOST : www
POINTS TO: ghs.google.com
TTL: 1 Hour
And then click on "Add Another".

STEP 5: Now we need to create 4 more record in same way but having different record type. Now this time select record type as A.
Choose record type A and add following entries.
RECORD TYPE: A
HOST : @
POINTS TO: 216.239.32.21
TTL: 1 Hour
Click on Add Another
RECORD TYPE: A
HOST : @
POINTS TO: 216.239.34.21
TTL: 1 Hour
Click on Add Another
RECORD TYPE: A
HOST : @
POINTS TO: 216.239.36.21
TTL: 1 Hour
Click on Add Another
RECORD TYPE: A
HOST : @
POINTS TO: 216.239.38.21.
TTL: 1 Hour
Great you have successfully created 4 record of record type A.
Once done you will see those 4 entry you have submit earlier, if record type A content more than four entry then delete that unused entry.
Your record type A must be look like below screen shot, there should not more than four entry.

Now final step click on Save changes.

You have successfully done your Godaddy setting.
Setting In Blogger or BlogSpot :
Now we will do some manual setting on blogger.
STEP 1: Log In to Blogger, headed to Setting > Basic and tab on setup 3party url for your blog.

STEP 2: After clicked you will get similar screen like below instead of my detail your detail will be there. type your registered domain address.

When you will tab on save you might get error like below.

Now we have to verify our domain ownership for blogger for that we need to create CNAME record on Godaddy for verifying.
STEP 3 : Create CNAME record on Godaddy and use HOST and point to field provided by blogger.
The values for Host and Points To must match what’s shown on the Blogger error. An example based on the above error is shown below.
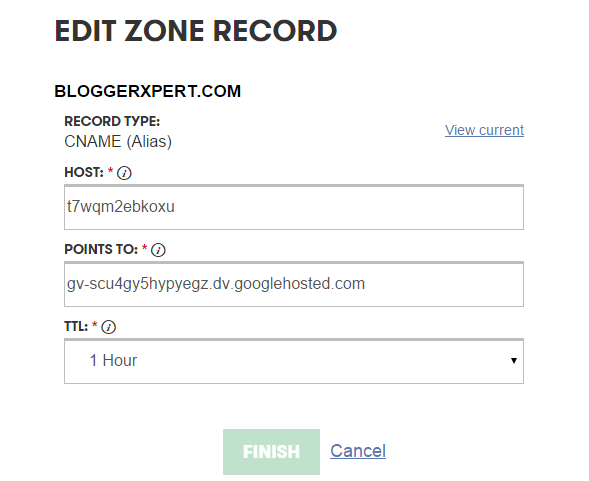
Click Finish and Save Changes again.
You have done verification step now go on blogger and Save it again this time you don't get error. if you got error then contact me here.
Once you save it, you will get screen like below, then click on Edit and redirect your blog from yourdomain.com to www.yourdomain.com

Click on Redirect.

Save it again.
You have successfully setup your custom domain to blogger, now your blog will be identify by new domain which you have setup.
Keep Blogging ! Enjoy !
0 comments:
Post a Comment
Thank you for visiting my blog, if you have any query regarding this post then please leave comment here.
Regard Meghshyam